How to troubleshoot common issues with BM1368 Series ASIC Chip Tester?
July 12, 2025
How to Troubleshoot Common Issues with BM1368 Series ASIC Chip Tester?
Introduction
In the fast-paced world of cryptocurrency mining, maintaining peak hardware performance is critical to maximizing profitability. The BM1368 Series ASIC Chip Tester has emerged as an indispensable tool for mining operators and repair technicians who rely on BM1368-based miners. Designed to diagnose and validate ASIC chips efficiently, this tester helps identify faulty components before they lead to costly downtime.
However, like any precision diagnostic tool, users may encounter occasional challenges when operating the BM1368 tester. Whether it’s connectivity issues, inconsistent test results, or power-related problems, knowing how to troubleshoot these issues can save valuable time and resources.
In this guide, we’ll explore common problems associated with the BM1368 Series ASIC Chip Tester, their root causes, and step-by-step solutions to ensure smooth operation.
Understanding the BM1368 Series ASIC Chip Tester
Before diving into troubleshooting, let’s briefly recap what makes this tester a preferred choice for mining professionals:
- Universal Compatibility – Supports all BM1368 variants (PB, AA, PA, PV), making it ideal for large-scale mining farms and repair centers.
- Rapid Diagnostic Efficiency – Quickly assesses chip health, reducing downtime in maintenance workflows.
- Quality Assurance – Verifies both new and used chips, ensuring only functional units enter production.
- Professional-Grade Design – Compact, portable, and built for durability in demanding mining environments.
Despite its reliability, certain operational issues may arise due to improper setup, environmental factors, or component wear. Below, we break down the most common scenarios and how to resolve them.
Common Issues & Troubleshooting Steps
1. Tester Not Powering On
Symptoms:
- No LED indicators when connected to power.
- The device remains unresponsive after pressing the power button.
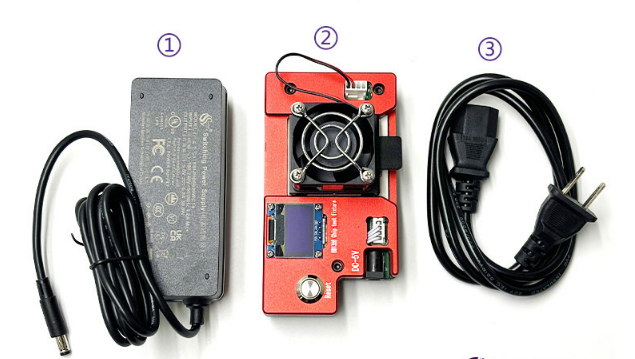
Possible Causes: ✔ Faulty Power Supply – The tester requires a stable 5V input; an incompatible or damaged adapter can prevent startup. ✔ Loose Connections – Poor contact between the power cable and the tester’s input port. ✔ Internal Circuit Issue – Rare but possible if the device has suffered physical damage.
Solutions:
- Verify the Power Adapter – Ensure you’re using the original 5V power supply included with the tester. Test the adapter with another device to confirm functionality.
- Check Cable Connections – Replug the power cable firmly into both the tester and the outlet. Try a different USB-C cable if available.
- Inspect for Physical Damage – Look for signs of burns, bent pins, or liquid damage inside the power port. If found, professional repair may be necessary.
2. Inconsistent or False Test Results
Symptoms:
- A known-good chip fails the test.
- Test results vary unpredictably between repeated tests on the same chip.
Possible Causes: ✔ Poor Chip Contact – Dust, oxidation, or misalignment on the test socket can disrupt signal integrity. ✔ Power Fluctuations – Unstable voltage input may cause erratic readings. ✔ Outdated Firmware – Older versions might have bugs affecting accuracy.
Solutions:
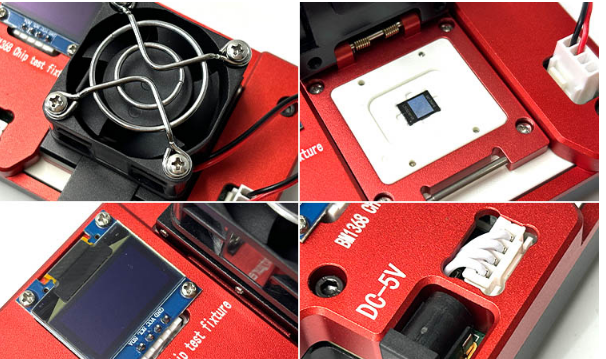
- Clean the Test Socket – Use a soft brush or compressed air to remove debris from the chip contacts. For oxidized pins, apply a small amount of isopropyl alcohol.
- Ensure Proper Chip Insertion – Align the chip correctly in the socket, applying gentle pressure to guarantee full contact.
- Stabilize Power Input – Connect the tester to a regulated power source or UPS to avoid voltage drops.
- Update Firmware – Check the manufacturer’s website for firmware updates that improve testing algorithms.
3. Tester Detects All Chips as Faulty
Symptoms:
- Every tested chip is reported as defective, even when known to be functional.
Possible Causes: ✔ Incorrect Test Mode Selected – Different BM1368 variants (PB, AA, PA, PV) require specific testing protocols. ✔ Calibration Drift – Over time, the tester’s internal calibration may shift, requiring adjustment. ✔ Damaged Test Socket – Worn-out connectors can cause false negatives.
Solutions:
- Confirm Chip Variant Selection – Double-check that the correct BM1368 model (e.g., PB vs. PV) is selected in the tester’s settings.
- Perform a Calibration Test – Some testers include a self-calibration feature; refer to the user manual for instructions.
- Test with a Known-Good Chip – Use a brand-new or verified working chip to rule out batch-wide defects.
- Contact Support if Issues Persist – If recalibration doesn’t help, the tester may need servicing.
4. Intermittent Connectivity Issues
Symptoms:
- The tester disconnects randomly during operation.
- Data transmission errors occur mid-test.
Possible Causes: ✔ Loose USB/Data Cable – A worn-out or poorly connected cable can interrupt communication. ✔ Driver/Software Conflicts – Outdated or corrupted drivers may cause instability. ✔ Electromagnetic Interference (EMI) – High-power mining equipment nearby can disrupt signals.
Solutions:
- Replace the USB Cable – Use a high-quality, shielded cable to minimize interference.
- Reinstall Drivers – Download the latest drivers from the manufacturer’s website.
- Relocate the Tester Away from High-Power Devices – Keep it at least a few feet away from miners or transformers.
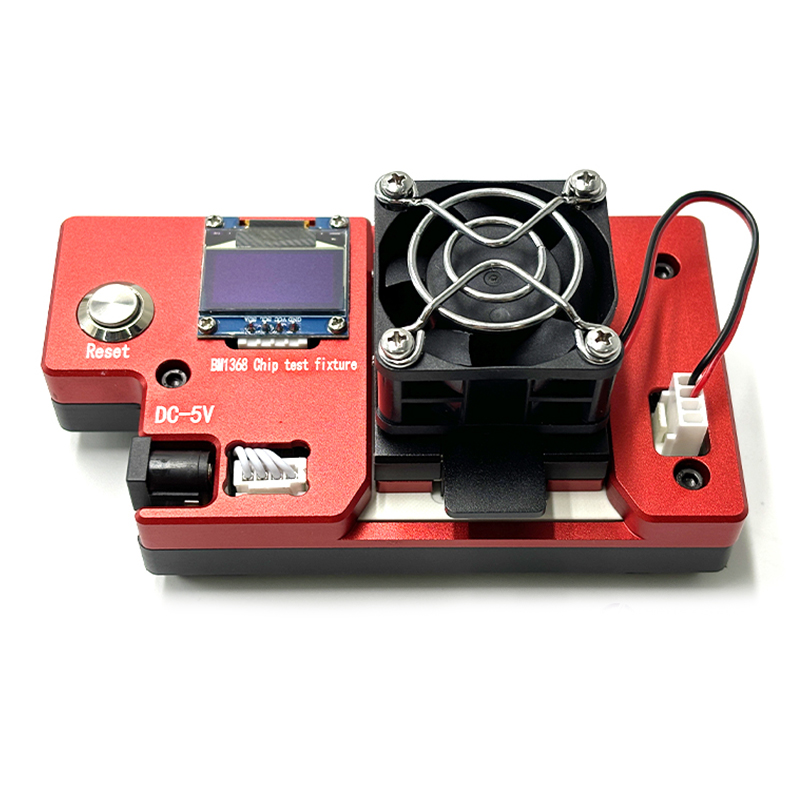
5. Overheating During Prolonged Use
Symptoms:
- The tester becomes excessively hot after extended testing sessions.
- Performance degrades or tests take longer to complete.
Possible Causes: ✔ Insufficient Ventilation – Blocked airflow around the tester can cause heat buildup. ✔ High Ambient Temperature – Mining facilities often run hot, exacerbating thermal stress.
Solutions:
- Allow Cooling Breaks – Let the tester rest for 10-15 minutes after continuous use.
- Improve Airflow – Position the tester near a fan or in a cooler section of the facility.
- Avoid Direct Sunlight – Keep the device away from heat sources like direct sunlight or miner exhaust vents.
Preventive Maintenance Tips
To minimize future issues, follow these best practices:
- Regularly Clean the Test Socket – Prevents dust buildup that can interfere with chip contact.
- Use a Surge Protector – Protects against power spikes that could damage the tester.
- Store in a Dry, Cool Place – Humidity and heat can degrade electronic components over time.
- Keep Firmware Updated – Ensures compatibility with new chip batches and bug fixes.
Conclusion
The BM1368 Series ASIC Chip Tester is a powerful diagnostic tool that plays a crucial role in maintaining mining efficiency. While occasional issues may arise, most problems can be resolved quickly with the right troubleshooting steps—whether it’s reseating a chip, checking power connections, or updating firmware.
By understanding these common challenges and applying proactive maintenance, mining operators can maximize the lifespan of their ASIC chips and keep their operations running smoothly. If persistent hardware faults occur, consulting the manufacturer’s support team ensures professional resolution without unnecessary downtime.
For mining professionals, mastering the BM1368 tester’s troubleshooting process isn’t just about fixing problems—it’s about optimizing performance, reducing waste, and ultimately boosting ROI in an increasingly competitive industry.