How to install and set up BM1368 Series ASIC Chip Tester for mining equipment?
February 26, 2025
How to Install and Set Up BM1368 Series ASIC Chip Tester for Mining Equipment?
Cryptocurrency mining operations rely heavily on the performance and reliability of ASIC chips, which are the backbone of modern mining hardware. When these chips malfunction or underperform, it can lead to significant downtime and revenue loss. This is where the BM1368 Series ASIC Chip Tester comes into play—a cutting-edge diagnostic tool designed specifically for testing and validating BM1368 series ASIC chips. Whether you’re a mining facility operator, a maintenance technician, or a professional repair specialist, this tester is an indispensable tool for ensuring the health and efficiency of your mining equipment.
In this guide, we’ll walk you through the installation and setup process of the BM1368 Series ASIC Chip Tester, highlighting its key features and advantages along the way. By the end, you’ll have a clear understanding of how to integrate this powerful tool into your mining operations for maximum efficiency and reliability.
Product Introduction: What is the BM1368 Series ASIC Chip Tester?
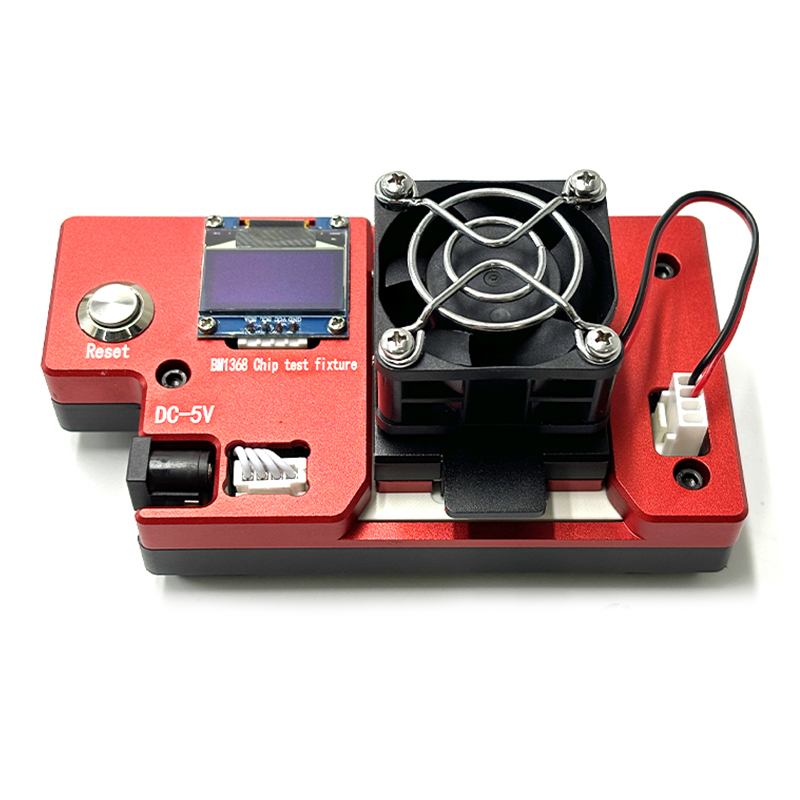
The BM1368 Series ASIC Chip Tester is a specialized diagnostic device engineered to test and validate the functionality of BM1368 series ASIC chips, including variants like BM1368PB, BM1368AA, BM1368PA, and BM1368PV. These chips are commonly used in popular mining hardware such as the Antminer S19 series, making the tester a critical tool for maintaining and optimizing mining operations.
This compact yet robust tester is designed with professional-grade components, ensuring accurate and reliable diagnostics in demanding mining environments. It features a dedicated 5V power supply system, advanced testing protocols, and a user-friendly interface that simplifies the testing process. Whether you’re testing new chips for quality assurance or diagnosing issues with used chips, the BM1368 Series ASIC Chip Tester delivers rapid and precise results.
Key Advantages of the BM1368 Series ASIC Chip Tester
Before diving into the installation process, let’s explore the standout features that make this tester a must-have for mining professionals:

- Universal Compatibility: Supports all BM1368 series chip variants, making it a versatile solution for diverse mining setups.
- Rapid Diagnostic Efficiency: Reduces troubleshooting time by providing instant chip quality assessments.
- Quality Assurance Excellence: Validates both new and pre-owned chips to ensure optimal performance and reliability.
- Professional Problem Resolution: Identifies persistent chip failures that may have been missed during previous repairs.
- Maintenance Optimization: Enhances workflow efficiency by enabling quick fault detection and quality verification.
- ROI-Focused Design: Compact and cost-effective, delivering exceptional value for mining facility maintenance.
- Enhanced Operational Reliability: Ensures only properly functioning chips are deployed, minimizing downtime and maintenance costs.
With these advantages in mind, let’s move on to the installation and setup process.
Step-by-Step Guide to Installing and Setting Up the BM1368 Series ASIC Chip Tester
Step 1: Unboxing and Initial Inspection
When you receive your BM1368 Series ASIC Chip Tester, the first step is to unbox and inspect the contents. The package typically includes:
- The main testing unit
- A 5V power supply cable
- Test fixtures and connectors
- User manual and documentation
Ensure all components are present and undamaged. If anything is missing or damaged, contact the supplier immediately.
Step 2: Setting Up the Testing Environment
To achieve accurate and reliable results, it’s essential to set up the tester in a suitable environment. Here’s what you need to consider:
- Workspace: Choose a clean, well-lit, and static-free workspace. Avoid areas with excessive dust or humidity, as these can affect the tester’s performance.
- Power Supply: Ensure you have access to a stable 5V power source. The tester comes with a dedicated power cable, so simply plug it into a compatible outlet.
- Temperature Control: Maintain a moderate ambient temperature (ideally between 15°C and 30°C) to prevent overheating during extended testing sessions.
Step 3: Connecting the Tester
Once your workspace is ready, follow these steps to connect the tester:
- Power Connection: Connect the 5V power supply cable to the tester and plug it into a power outlet.
- Test Fixture Setup: Attach the appropriate test fixture for the BM1368 chip variant you’re testing. The tester supports multiple fixtures, so ensure you’re using the correct one for your specific chip.
- Chip Placement: Carefully place the ASIC chip onto the test fixture, ensuring proper alignment with the connectors. Misalignment can lead to inaccurate results or damage to the chip.
Step 4: Powering On and Initial Configuration
With the connections in place, power on the tester. The device will perform a self-check to ensure all components are functioning correctly. Once the self-check is complete, you’ll be prompted to configure the following settings:
- Chip Variant Selection: Choose the specific BM1368 chip variant you’re testing (e.g., BM1368PB, BM1368AA).
- Testing Mode: Select the desired testing mode (e.g., quick test, full diagnostic, or custom parameters).
- Output Preferences: Configure how you want the results displayed (e.g., on-screen summary, detailed report).
Step 5: Running the Test
After configuring the settings, initiate the testing process. The tester will automatically run a series of diagnostic checks, including:
- Functionality Assessment: Verifies whether the chip is operational.
- Performance Metrics: Measures key performance indicators such as hash rate and power consumption.
- Fault Detection: Identifies any defects or malfunctions within the chip.
The entire process typically takes just a few minutes, depending on the selected testing mode. Once complete, the tester will display the results, indicating whether the chip is functional, partially functional, or defective.
Step 6: Interpreting the Results
The BM1368 Series ASIC Chip Tester provides clear and actionable results, making it easy to determine the next steps:
- Functional Chip: If the chip passes all tests, it’s ready for deployment in your mining hardware.
- Partially Functional Chip: If the chip shows minor issues, you may choose to repair or repurpose it for less demanding tasks.
- Defective Chip: If the chip fails the tests, it should be replaced or recycled to avoid further complications.
Step 7: Maintenance and Best Practices
To ensure the longevity and accuracy of your BM1368 Series ASIC Chip Tester, follow these maintenance tips:

- Regular Calibration: Periodically calibrate the tester to maintain its precision.
- Cleanliness: Keep the test fixtures and connectors clean to prevent contamination.
- Software Updates: Check for firmware updates from the manufacturer to access the latest features and improvements.
Real-World Applications and Benefits
The BM1368 Series ASIC Chip Tester is more than just a diagnostic tool—it’s a game-changer for mining operations. Here are some real-world scenarios where it proves invaluable:
- Quality Assurance for New Chips: Verify the performance of new chips before deploying them in your mining hardware.
- Diagnostics for Used Chips: Identify and resolve issues with pre-owned chips, extending their lifespan and reducing waste.
- Troubleshooting Persistent Failures: Pinpoint recurring problems that may have been overlooked during previous repairs.
- Optimizing Maintenance Workflows: Streamline your maintenance processes by quickly identifying faulty chips and minimizing downtime.
Conclusion
The BM1368 Series ASIC Chip Tester is an essential tool for anyone involved in cryptocurrency mining operations. Its universal compatibility, rapid diagnostic capabilities, and professional-grade design make it a standout solution for maintaining and optimizing mining hardware. By following the installation and setup guide outlined above, you can seamlessly integrate this tester into your workflow, ensuring the reliability and efficiency of your mining equipment.
Investing in the BM1368 Series ASIC Chip Tester is not just about solving immediate problems—it’s about future-proofing your mining operations. With this powerful tool at your disposal, you can minimize downtime, reduce maintenance costs, and maximize your return on investment. So, take the first step toward enhanced operational reliability and equip your mining facility with the BM1368 Series ASIC Chip Tester today.