How to install and set up BM1368 Series ASIC Chip Tester for mining equipment?
March 24, 2025
How to Install and Set Up BM1368 Series ASIC Chip Tester for Mining Equipment?
In the fast-paced world of cryptocurrency mining, the efficiency and reliability of your hardware are paramount. The BM1368 Series ASIC Chip Tester emerges as a game-changing tool for mining operators and maintenance professionals, offering precise diagnostics and validation for BM1368 series ASIC chips. Whether you’re managing a large-scale mining facility or running a professional repair center, this advanced testing instrument can significantly enhance your operational efficiency. This guide will walk you through the installation and setup process of the BM1368 Series ASIC Chip Tester, highlighting its advantages and practical applications.
Introducing the BM1368 Series ASIC Chip Tester
The BM1368 Series ASIC Chip Tester is a specialized diagnostic tool designed to test and validate BM1368 series ASIC chips, including variants like BM1368PB, BM1368AA, BM1368PA, and BM1368PV. Its compact, professional-grade design makes it an indispensable tool for mining operators who need to ensure the functionality and performance of their chips.
Key Features:
- Universal Compatibility: Supports all BM1368 series chips, making it versatile for various mining setups.
- Rapid Diagnostic Efficiency: Provides instant chip quality assessment, reducing troubleshooting time.
- Quality Assurance Excellence: Validates both new and pre-owned chips, ensuring optimal performance.
- Professional Problem Resolution: Identifies persistent chip failures, minimizing downtime.
- Maintenance Optimization: Enhances workflow efficiency through quick fault detection.
- ROI-Focused Design: Compact and cost-effective, delivering exceptional value for mining operations.
- Enhanced Operational Reliability: Ensures only properly functioning chips are deployed, reducing maintenance costs.
Why the BM1368 Series ASIC Chip Tester Stands Out
Before diving into the installation process, it’s essential to understand why this tester is a must-have for mining professionals.
- Comprehensive Testing: Unlike generic tools, the BM1368 Series ASIC Chip Tester is specifically engineered for BM1368 chips, ensuring accurate diagnostics tailored to their unique specifications.
- Time-Saving: Rapid testing capabilities allow maintenance teams to identify and resolve issues quickly, minimizing downtime.
- Cost-Effective: By validating chip quality before deployment, this tester helps prevent costly operational disruptions and extends the lifespan of your mining equipment.
- Portability: At just 1KG, the tester is lightweight and easy to transport, making it ideal for use across multiple mining sites.
Step-by-Step Installation and Setup Guide
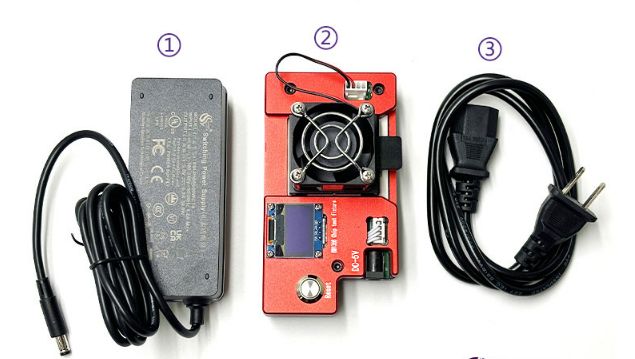
Step 1: Unboxing and Initial Inspection
Upon receiving your BM1368 Series ASIC Chip Tester, carefully unbox the package and inspect the contents. The kit should include:

- The main test fixture host
- A dedicated 5V power supply system
- Power cable and necessary accessories
Ensure all components are present and undamaged before proceeding.
Step 2: Setting Up the Testing Environment
To achieve accurate results, it’s crucial to set up the tester in a stable and controlled environment:
- Space Requirements: Place the tester on a flat, stable surface with sufficient space for operation.
- Power Supply: Connect the tester to a reliable power source using the provided 5V power supply system. Avoid using unstable or fluctuating power sources, as they can affect testing accuracy.
- Temperature and Humidity: Maintain an environment with moderate temperature and humidity levels, as extreme conditions can impact chip performance and test results.
Step 3: Connecting the Test Fixture Host
- Power Connection: Connect the test fixture host to the power supply using the provided power cable.
- Chip Placement: Carefully insert the BM1368 series ASIC chip into the designated slot on the test fixture host. Ensure the chip is properly aligned and securely seated to avoid connection issues.
- Initialization: Power on the tester and allow it to initialize. The system will perform a self-check to ensure all components are functioning correctly.
Step 4: Running the Diagnostic Test
Once the tester is initialized, you can begin the diagnostic process:
- Select Chip Variant: Use the interface to select the specific BM1368 chip variant you’re testing (e.g., BM1368PB, BM1368AA).
- Start Test: Initiate the diagnostic test. The tester will run a series of algorithms to assess the chip’s functionality and performance metrics.
- Review Results: After the test is complete, the results will be displayed on the interface. The system will indicate whether the chip is functioning optimally or if there are any issues that need attention.
Step 5: Interpreting the Results
The BM1368 Series ASIC Chip Tester provides detailed diagnostic information, including:
- Chip functionality status (pass/fail)
- Performance metrics (e.g., hash rate, power consumption)
- Potential issues (e.g., overheating, connectivity problems)
Use these results to make informed decisions about chip deployment or further troubleshooting.

Practical Applications in Mining Operations
The BM1368 Series ASIC Chip Tester is more than just a diagnostic tool—it’s a strategic asset for optimizing mining operations. Here’s how it can add value to your workflow:
- Quality Control for New Chips: Validate the performance of new chips before installation, ensuring they meet operational standards.
- Reconditioning Used Chips: Assess the condition of pre-owned chips to determine their suitability for continued use.
- Troubleshooting Persistent Issues: Identify and resolve recurring chip failures that may have gone unnoticed with other testing methods.
- Streamlining Maintenance Workflows: Reduce downtime by quickly diagnosing and addressing hardware issues.
- Enhancing ROI: By ensuring only high-quality chips are deployed, this tester helps maximize the return on investment for your mining equipment.
Tips for Optimal Performance
To get the most out of your BM1368 Series ASIC Chip Tester, follow these best practices:
- Regular Calibration: Periodically calibrate the tester to maintain accuracy.
- Proper Storage: Store the tester in a dry, dust-free environment when not in use.
- Firmware Updates: Keep the tester’s firmware up to date to benefit from the latest diagnostic algorithms and features.
- Training: Ensure maintenance teams are adequately trained on using the tester to maximize its potential.
Conclusion
The BM1368 Series ASIC Chip Tester is a powerful tool that brings precision, efficiency, and reliability to cryptocurrency mining operations. By following this installation and setup guide, you can seamlessly integrate this tester into your workflow and unlock its full potential. Whether you’re validating new chips, reconditioning used ones, or troubleshooting persistent issues, this advanced diagnostic instrument will help you maintain optimal mining performance and maximize your ROI.
Investing in the BM1368 Series ASIC Chip Tester is not just a step toward better hardware maintenance—it’s a strategic move toward sustainable and profitable mining operations.