How to install heat sinks for effective temperature control in ASIC miners?
April 21, 2025
How to Install Heat Sinks for Effective Temperature Control in ASIC Miners?
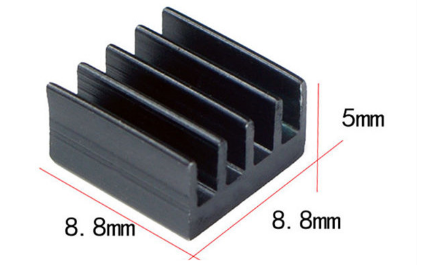
Cryptocurrency mining is an energy-intensive process, and ASIC miners are at the heart of this operation. However, the high computational power of ASIC miners generates significant heat, which, if not managed properly, can lead to thermal throttling, reduced efficiency, and even hardware failure. One of the most effective ways to manage this heat is by installing precision-engineered heat sinks. This article will guide you through the installation process of heat sinks for optimal temperature control in ASIC miners, while also highlighting the advantages of using a high-quality heat sink like the 8.8mm × 8.8mm × 5mm aluminum alloy heat sink.
Product Introduction: The Precision-Engineered Heat Sink
The 8.8mm × 8.8mm × 5mm aluminum alloy heat sink is a state-of-the-art thermal management solution designed specifically for ASIC mining control boards. Its compact dimensions and lightweight design make it an ideal choice for the confined spaces within mining rigs. Crafted from high-grade aluminum alloy, this heat sink features a multi-piece construction that maximizes thermal dissipation efficiency. The design incorporates advanced thermal engineering principles to facilitate rapid heat transfer from critical components, such as CPUs and power management chips on mining control boards.
Thermal Interface Integration
One of the standout features of this heat sink is its integration with a specialized thermal interface material (TIM) layer. This thermally conductive silica gel ensures optimal thermal conductivity between the heat-generating components and the heat sink surface, creating an efficient thermal pathway for heat dissipation. This integration is crucial for maintaining consistent thermal regulation, which is essential for the longevity and performance of your ASIC miner.
Step-by-Step Guide to Installing Heat Sinks on ASIC Miners
Step 1: Gather Your Tools and Materials
Before you begin the installation process, ensure you have all the necessary tools and materials:

- Precision-engineered aluminum alloy heat sink (8.8mm × 8.8mm × 5mm)
- Thermal interface material (TIM)
- Isopropyl alcohol and lint-free cloth for cleaning
- Thermal paste applicator or spatula
- Screwdriver set (if required for your specific ASIC miner model)
Step 2: Prepare the ASIC Miner
- Power Down the Miner: Ensure the ASIC miner is powered off and unplugged from any electrical source.
- Open the Miner Case: Carefully open the miner case to access the control board. Refer to your miner’s manual for specific instructions on how to do this without damaging any components.
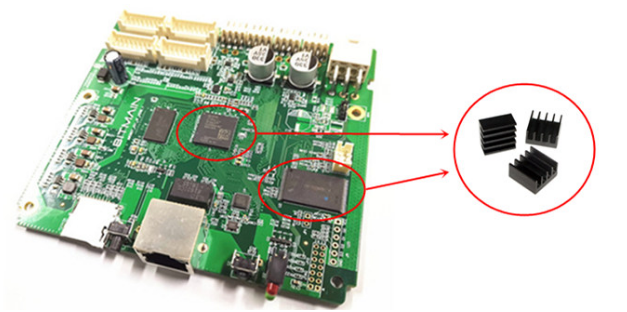
- Identify the Heat-Generating Components: Locate the CPUs and power management chips on the control board. These are the primary components that will benefit from the heat sink installation.
Step 3: Clean the Components
- Clean the Surface: Use isopropyl alcohol and a lint-free cloth to clean the surface of the heat-generating components. This removes any dust, grease, or old thermal paste that could interfere with the heat sink’s performance.
- Allow to Dry: Let the cleaned surfaces dry completely before proceeding to the next step.
Step 4: Apply Thermal Interface Material (TIM)
- Apply a Thin Layer of TIM: Using a thermal paste applicator or spatula, apply a thin, even layer of thermal interface material to the surface of the heat-generating components. Be careful not to apply too much, as excess TIM can reduce thermal conductivity.
- Spread Evenly: Ensure the TIM is evenly spread across the entire surface to maximize contact with the heat sink.
Step 5: Install the Heat Sink
- Position the Heat Sink: Carefully place the heat sink over the heat-generating component, ensuring it aligns perfectly with the surface.
- Secure the Heat Sink: If your heat sink comes with mounting brackets or screws, use them to secure the heat sink in place. Ensure it is firmly attached but not overly tightened, as this could damage the components.
- Check Contact: Verify that the heat sink is making full contact with the component. Any gaps can significantly reduce thermal efficiency.
Step 6: Reassemble the Miner
- Close the Miner Case: Once the heat sink is securely installed, carefully close the miner case.
- Reconnect Power: Plug the miner back into the power source and power it on.
Product Advantages: Why Choose This Heat Sink?
Optimized Spatial Efficiency
The 8.8mm × 8.8mm × 5mm dimensions of this heat sink are precisely calculated to maximize cooling performance while minimizing the spatial footprint within mining rigs. This ensures that you can maintain optimal thermal management without sacrificing valuable space in your mining setup.
Advanced Thermal Management
This heat sink delivers superior temperature control at critical device nodes, maintaining optimal operating conditions well within specified thermal limits. By preventing thermal throttling, it helps extend the lifespan of your ASIC miner components.
Enhanced Power Efficiency
Efficient heat dissipation significantly reduces thermal-induced power losses, resulting in improved overall system efficiency and reduced operating costs. This is particularly important in cryptocurrency mining, where every watt of power counts.
Environmental Control Excellence
The multi-piece design of this heat sink facilitates improved air circulation and heat displacement, creating an optimized microenvironment around critical components. This strategic airflow management ensures that your miner operates at peak efficiency.
Durability-Focused Design
Constructed from premium aluminum alloy, this heat sink is built to withstand the rigors of continuous high-temperature conditions. Its robust design ensures long-term reliability and consistent thermal performance throughout extended mining operations.
Thermal Interface Optimization
Engineered to work seamlessly with thermal interface materials, this heat sink maximizes heat transfer efficiency from components to the heat sink surface. This optimization ensures consistent thermal conductivity across the entire contact area, further enhancing its cooling capabilities.
Installation Versatility
Designed for compatibility with various control board configurations, this heat sink maintains optimal thermal contact across different mining hardware setups. Its versatility makes it a suitable choice for a wide range of ASIC miners.
Conclusion
Effective temperature control is crucial for the performance and longevity of your ASIC miner. By following the steps outlined in this guide, you can successfully install a precision-engineered heat sink like the 8.8mm × 8.8mm × 5mm aluminum alloy heat sink to manage the heat generated by your mining operations. With its advanced thermal management, optimized spatial efficiency, and durability-focused design, this heat sink offers a reliable solution to keep your miner running smoothly and efficiently. Investing in high-quality thermal management solutions not only enhances your mining performance but also protects your valuable hardware from thermal-induced degradation, ensuring a more profitable and sustainable mining operation.